源码篇之表单登录认证流程
1. 简介
本篇文章主要学习Spring Security中用户名密码认证的执行流程。
在前面我们已经提到了Spring Security是基于过滤器实现的,并介绍了过滤器及相关的认证组件。现在,我们将深入源码,详细了解用户名密码认证的整个流程。
2. 配置表单登录
在前面我们已经提到了Spring Boot自动配置了添加了默认的认证规则:
@Bean
@Order(2147483642)
SecurityFilterChain defaultSecurityFilterChain(HttpSecurity http) throws Exception {
    // 配置所有的Http请求必须认证
    ((AuthorizeHttpRequestsConfigurer.AuthorizedUrl)http.authorizeHttpRequests().anyRequest()).authenticated();
    // 开启表单登录
    http.formLogin();
    // 开启Basic认证
    http.httpBasic();
    return (SecurityFilterChain)http.build();
}
在使用Spring Security时,定制一些安全规则是不可避免的。然而,6.0版本及其之前版本的配置方式发生了较大变化。之前的做法通常是继承WebSecurityConfigurerAdapter类,并重写其中的方法,如下所示:
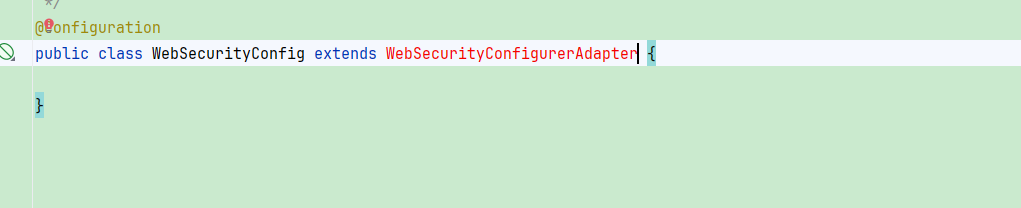
Spring Security 6.x 及以后的版本中已经删除 WebSecurityConfigurerAdapter,新版中需要按照以下方式 来配置HttpSecurity和WebSecurity` :
@Configuration
@EnableWebSecurity(debug = false)
public class WebSecurityConfig{

    @Bean
    public SecurityFilterChain filterChain(HttpSecurity http) throws Exception {
        http
            .csrf(Customizer.withDefaults())
            .authorizeHttpRequests(authorize -> authorize
                    .anyRequest().authenticated()
            )
            .httpBasic(Customizer.withDefaults())
            .formLogin(Customizer.withDefaults());
        return http.build();
    }

    @Bean
    WebSecurityCustomizer webSecurityCustomizer() {
        return web -> web.ignoring().requestMatchers("/hello");
    }
}配置中http.formLogin()表示开启表单认证,该方法中应用了一个表单登录配置类 FormLoginConfigurer:
public HttpSecurity formLogin(Customizer<FormLoginConfigurer<HttpSecurity>> formLoginCustomizer) throws Exception {
    formLoginCustomizer.customize((FormLoginConfigurer)this.getOrApply(new FormLoginConfigurer()));
    return this;
}在FormLoginConfigurer的构造方法中,会配置添加UsernamePasswordAuthenticationFilter,用于处理用户名密码认证,并对请求参数的名称进行了设置:
public FormLoginConfigurer() {
    super(new UsernamePasswordAuthenticationFilter(), (String)null);
    this.usernameParameter("username");
    this.passwordParameter("password");
}在父类的构造函数和配置类的构建过程中,还会进行一些相关的配置,包括设置登录请求URL、配置DefaultLoginPageGeneratingFilter(用于生成登录页面的过滤器)等。
3. 重定向登录页
首先添加一个访问测试接口:
@GetMapping("/test")
public Object test() {
    return "Hello Security!!";
}未登录时访问接口,会重定向到登录页,流程图如下说示:
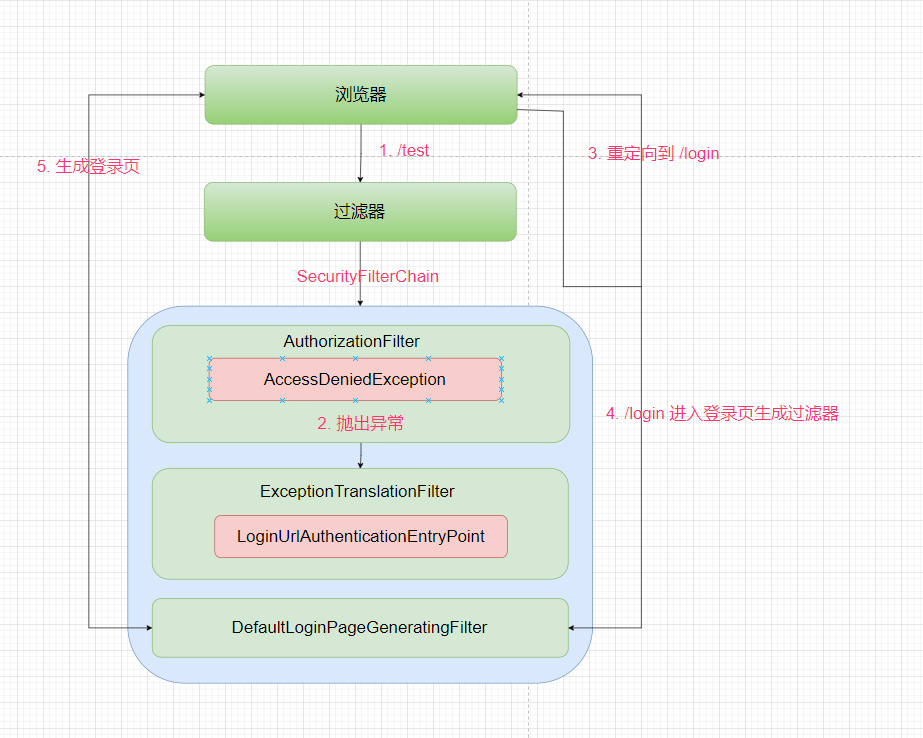
流程图说明:
- 一个用户向其未被授权的资源(/test)发出一个未经认证的请求。
- 请求进入SecurityFilterChain开始执行过滤器,在AuthorizationFilter中校验不通过,抛出一个AccessDeniedException。
- ExceptionTranslationFilter 捕获到异常,调用LoginUrlAuthenticationEntryPoint 重定向到/login。
- 重定向的/login发起请求进入过滤器
- /login会被DefaultLoginPageGeneratingFilter处理,直接响应写出默认登录页。
3.1 抛出 AccessDeniedException
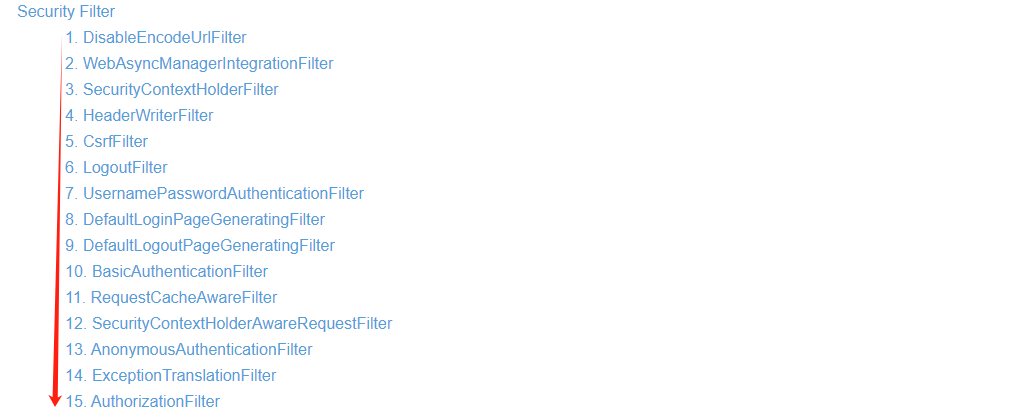
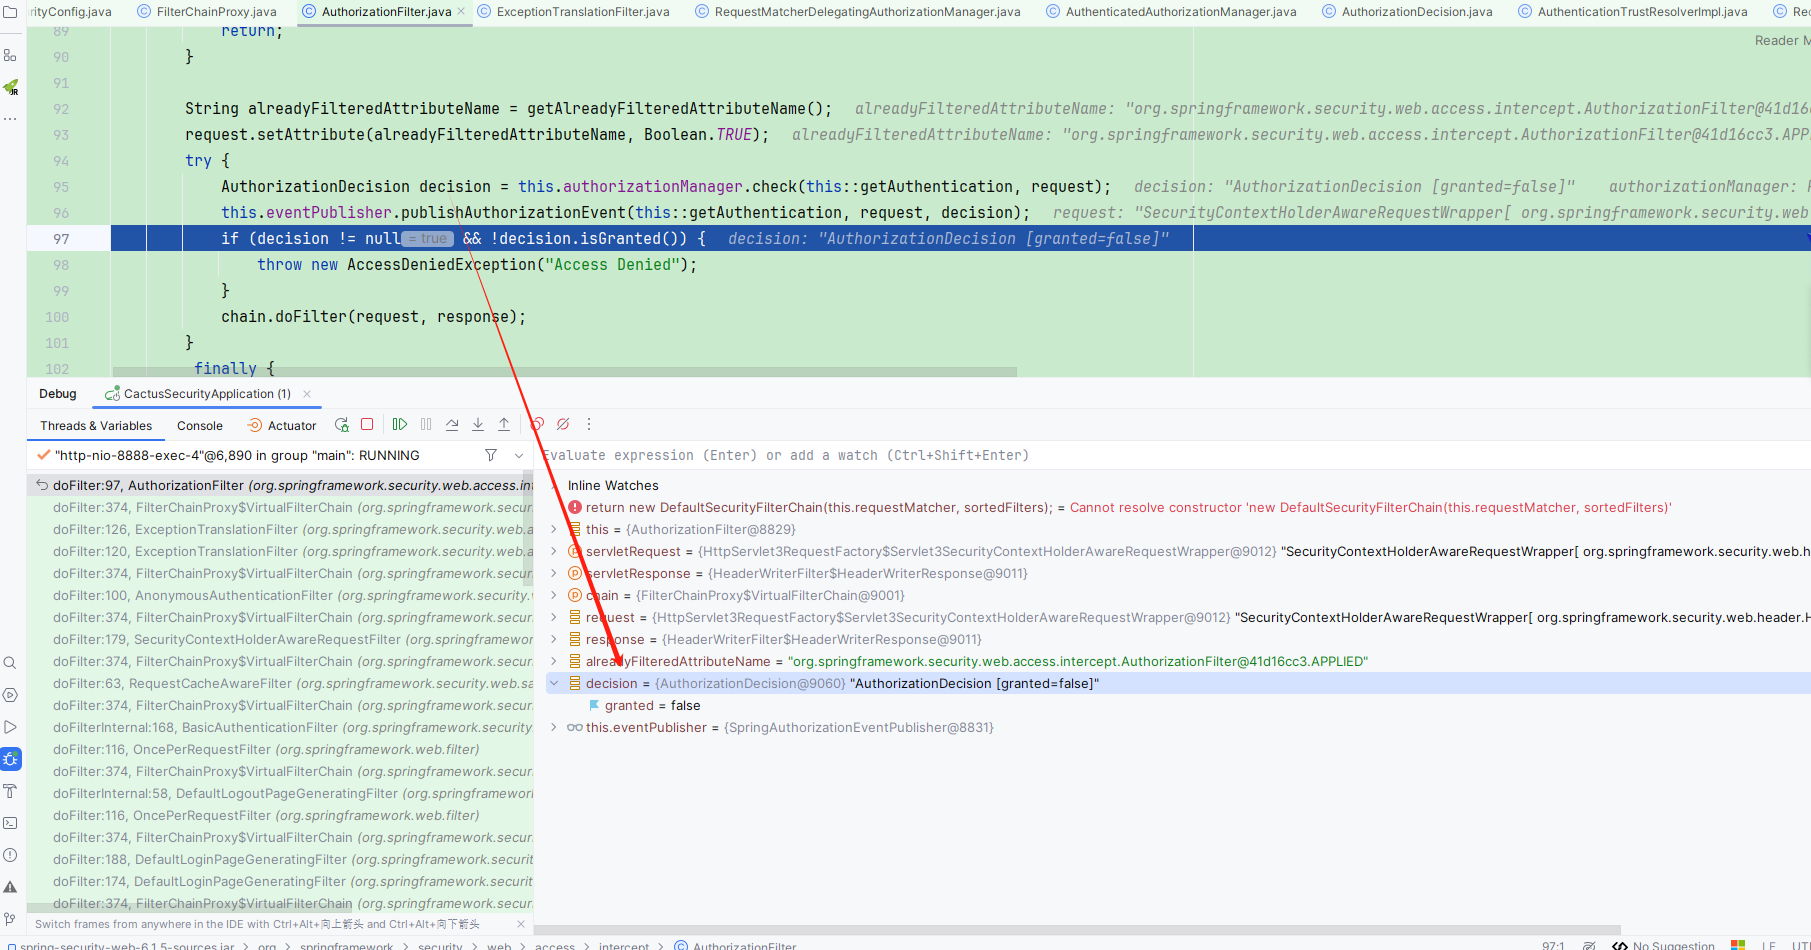
访问上述接口地址,在Spring Security 6.0系列【4】源码篇之默认过滤器 中,有介绍请求最开始是到达FilterChainProxy,由它来调用SecurityFilterChain中的过滤器,/test是没有经过认证的,依次通过下述所有过滤器。
在经过最后一个过滤器 AuthorizationFilter 时,进行了最终的权限校验。如果当前请求缺乏执行所需操作的权限,那么会触发抛出 AccessDeniedException 异常。这表示请求被拒绝,因为用户没有足够的权限执行相应的操作。
		try {
            // 调用AuthorizationManager 检查当前是否有权限
			AuthorizationDecision decision = this.authorizationManager.check(this::getAuthentication, request);
            // 发布事件
			this.eventPublisher.publishAuthorizationEvent(this::getAuthentication, request, decision);
            // 如果未被授权,抛出 AccessDeniedException
			if (decision != null && !decision.isGranted()) {
				throw new AccessDeniedException("Access Denied");
			}
			chain.doFilter(request, response);
		}
		finally {
			request.removeAttribute(alreadyFilteredAttributeName);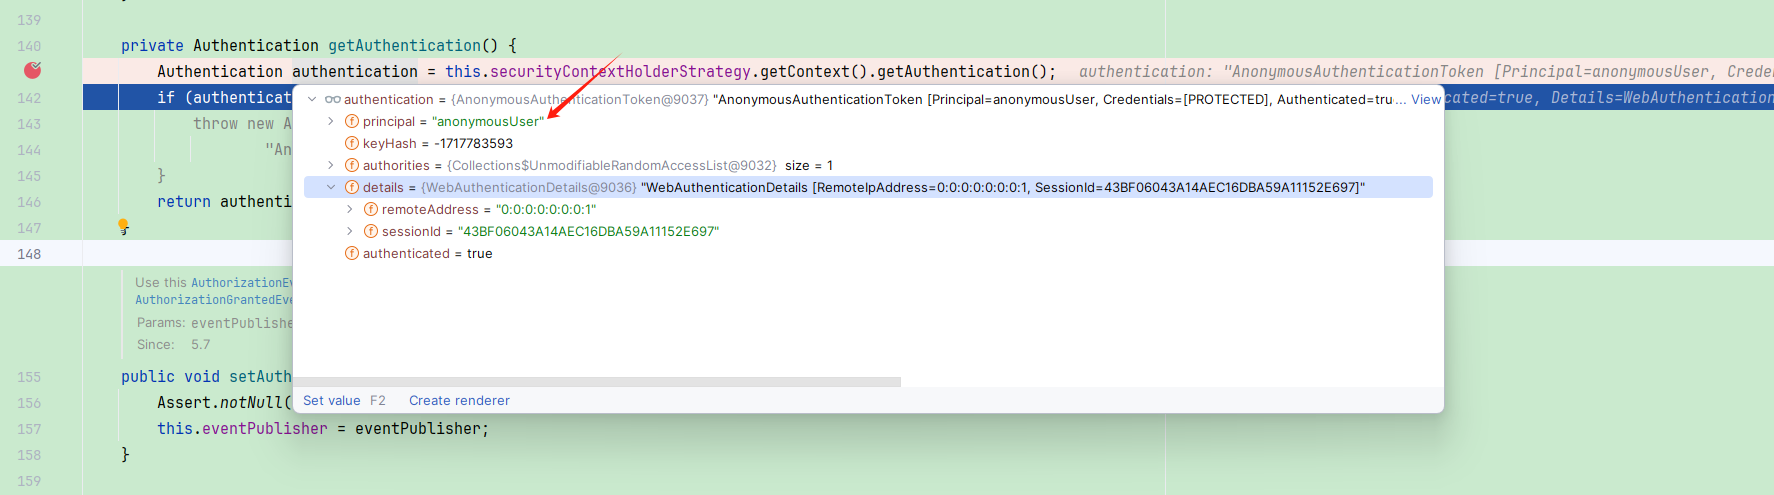
}首先,AuthorizationFilter会提取当前用户的认证信息。由于当前请求尚未经过认证,因此用户将是由AnonymousAuthenticationFilter创建的匿名用户。
接着,使用AuthorizationManager 授权管理器对当前的认证信息进行检查。由于当前用户是匿名用户,因此判定当前请求无权访问,并触发抛出 AccessDeniedException 异常。
3.2 异常处理
抛出的AccessDeniedException异常会被ExceptionTranslationFilter捕获:
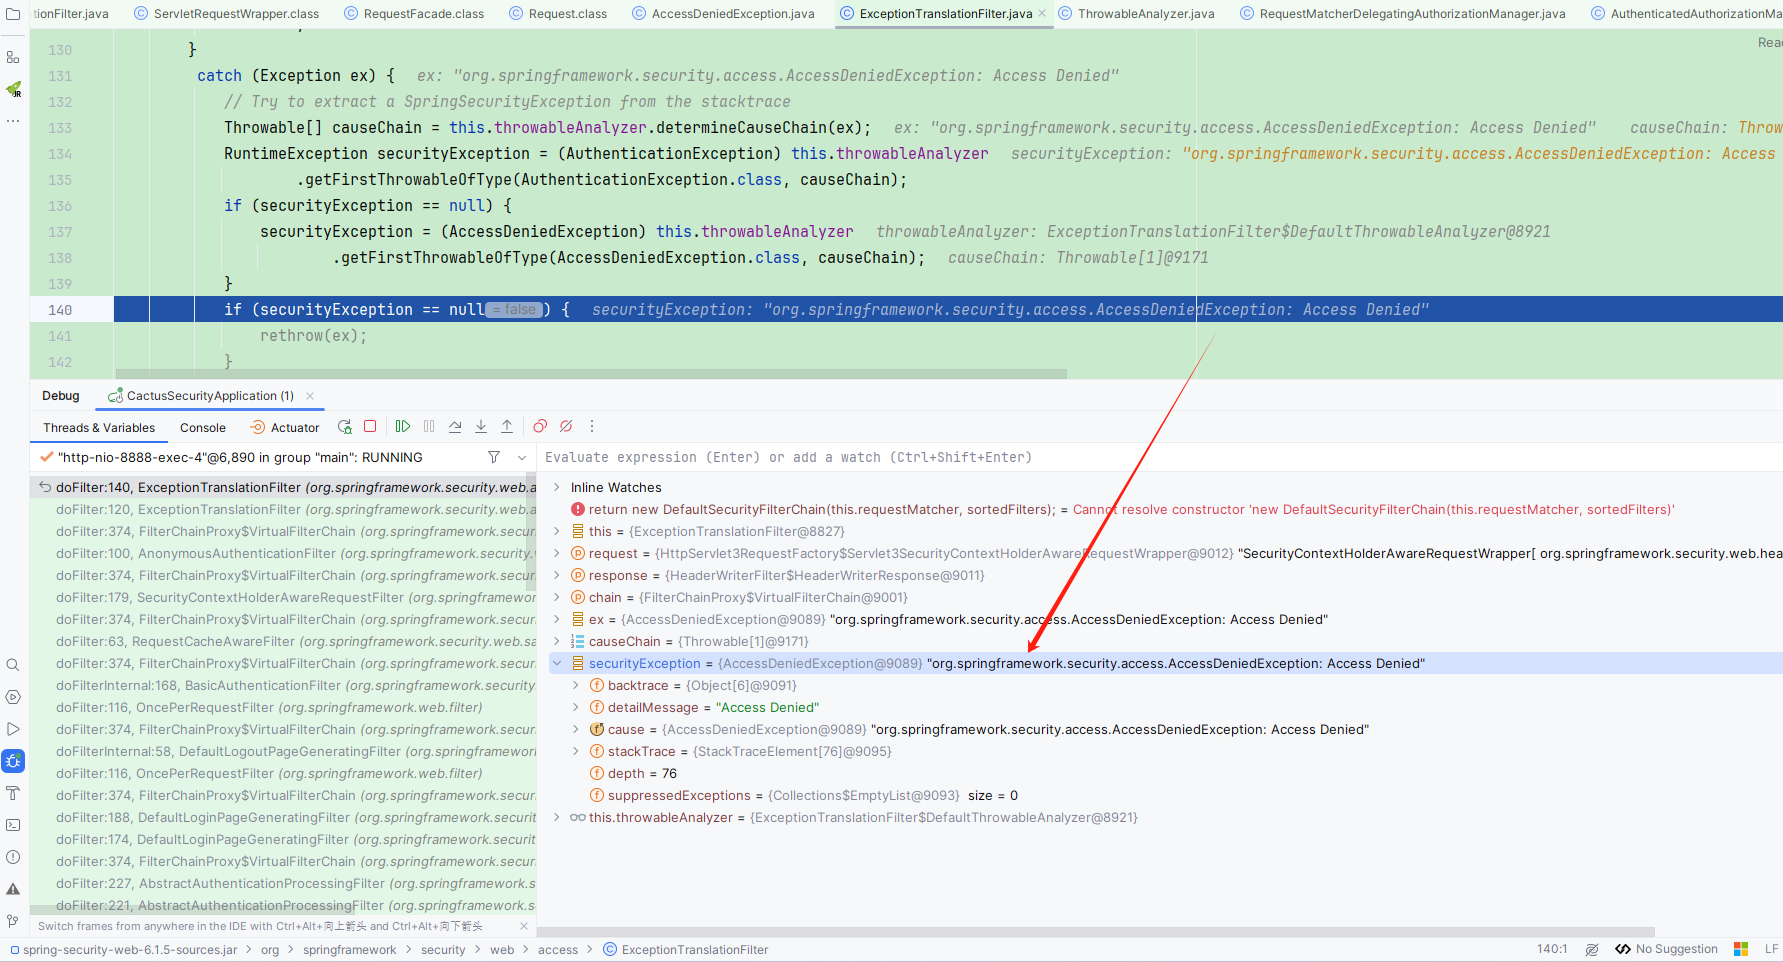
ExceptionTranslationFilter根据异常类型进行相应处理:
	private void handleSpringSecurityException(HttpServletRequest request, HttpServletResponse response,
			FilterChain chain, RuntimeException exception) throws IOException, ServletException {
		if (exception instanceof AuthenticationException) {
            // 处理 AuthenticationException(身份验证异常)
			handleAuthenticationException(request, response, chain, (AuthenticationException) exception);
		}
		else if (exception instanceof AccessDeniedException) {
            // 处理 AccessDeniedExceptio(访问拒绝异常)
			handleAccessDeniedException(request, response, chain, (AccessDeniedException) exception);
		}
}接着调用handleAccessDeniedException:
	private void handleAccessDeniedException(HttpServletRequest request, HttpServletResponse response,
			FilterChain chain, AccessDeniedException exception) throws ServletException, IOException {
		// 获取用户认证信息
		Authentication authentication = this.securityContextHolderStrategy.getContext().getAuthentication();
        // 当前是匿名用户
		boolean isAnonymous = this.authenticationTrustResolver.isAnonymous(authentication);
		if (isAnonymous || this.authenticationTrustResolver.isRememberMe(authentication)) {
			if (logger.isTraceEnabled()) {
				logger.trace(LogMessage.format("Sending %s to authentication entry point since access is denied",
						authentication), exception);
			}
            // 当前是匿名用户,需要发送认证页面
			sendStartAuthentication(request, response, chain,
					new InsufficientAuthenticationException(
							this.messages.getMessage("ExceptionTranslationFilter.insufficientAuthentication",
									"Full authentication is required to access this resource")));
		}
		else {
			if (logger.isTraceEnabled()) {
				logger.trace(
						LogMessage.format("Sending %s to access denied handler since access is denied", authentication),
						exception);
			}
            // 不是匿名用户,也不是记住我用户,调用访问拒绝处理器AccessDeniedHandler
			this.accessDeniedHandler.handle(request, response, exception);
		}
}接着调用sendStartAuthentication缓存请求,并调用AuthenticationEntryPoint生成认证入口:
	protected void sendStartAuthentication(HttpServletRequest request, HttpServletResponse response, FilterChain chain,
			AuthenticationException reason) throws ServletException, IOException {
		// 创建空的SecurityContext
		SecurityContext context = this.securityContextHolderStrategy.createEmptyContext();
		this.securityContextHolderStrategy.setContext(context);
        // 请求缓存中保存当前请求,使用的是HttpSession
		this.requestCache.saveRequest(request, response);
        // 调用AuthenticationEntryPoint
		this.authenticationEntryPoint.commence(request, response, reason);
	}
3.3 重定向
接着调用到LoginUrlAuthenticationEntryPoint进行重定向或者转发:
	@Override
	public void commence(HttpServletRequest request, HttpServletResponse response,
			AuthenticationException authException) throws IOException, ServletException {
		if (!this.useForward) {
           //  重定向至登录页面。如果 forceHttps true ,则使用 https
        	// 重定向的登录页地址:http://localhost:10001/login
			String redirectUrl = buildRedirectUrlToLoginPage(request, response, authException);
            // 执行
			this.redirectStrategy.sendRedirect(request, response, redirectUrl);
			return;
		}
		String redirectUrl = null;
		if (this.forceHttps && "http".equals(request.getScheme())) {
			// 首先将当前请求重定向到 HTTPS。收到该请求后,将使用转发到登录页面。
			redirectUrl = buildHttpsRedirectUrlForRequest(request);
		}
		if (redirectUrl != null) {
			this.redirectStrategy.sendRedirect(request, response, redirectUrl);
			return;
		}
		String loginForm = determineUrlToUseForThisRequest(request, response, authException);
		logger.debug(LogMessage.format("Server side forward to: %s", loginForm));
		RequestDispatcher dispatcher = request.getRequestDispatcher(loginForm);
		dispatcher.forward(request, response);
		return;
	}
3.4 生成默认页面
重定向后浏览器地址变为http://localhost:8888/login,发起GET请求,此时又会开始执行过滤器:
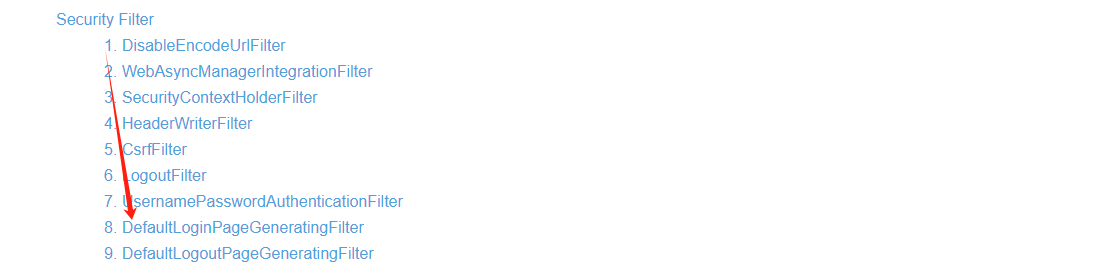
在经过DefaultLoginPageGeneratingFilter时,进行默认登录页的处理。在这个过滤器中,维护了许多参数,用于配置和定制默认登录页。
    // 默认登录页面 URL
	public static final String DEFAULT_LOGIN_PAGE_URL = "/login";
    // 错误参数名称
	public static final String ERROR_PARAMETER_NAME = "error";
    // 登录页面网址, 默认 /login
	private String loginPageUrl;
    // 登出成功页网址,默认 /login?logout
	private String logoutSuccessUrl;
    // 登录错误页网址,默认 /login?error
	private String failureUrl;
    // 是否开启表单登录
	private boolean formLoginEnabled;
	// 是否开启oauth2登录
	private boolean oauth2LoginEnabled;
    // 是否开启saml2登录
	private boolean saml2LoginEnabled;
    // 认证请求地址,默认 /login
	private String authenticationUrl;
    // 用户名参数,默认username
	private String usernameParameter;
    // 密码参数,默认password
	private String passwordParameter;
    // 记住用户
	private String rememberMeParameter;
    // oauth 2 客户端名称的身份验证 URL
	private Map<String, String> oauth2AuthenticationUrlToClientName;
    // saml 2 提供程序名称的身份验证 URL
	private Map<String, String> saml2AuthenticationUrlToProviderName;
    // 解析隐藏输入
	private Function<HttpServletRequest, Map<String, String>> resolveHiddenInputs = (request) -> Collections.emptyMap();
当发生重定向到GET请求的 /login 时,会触发生成登录页面的逻辑。在这个过程中,会通过调用 response 直接输出一个页面,并在此处返回,不再执行后续的操作。这确保了在重定向到登录页时,后续的处理逻辑被中止。
	private void doFilter(HttpServletRequest request, HttpServletResponse response, FilterChain chain)
			throws IOException, ServletException {
	    // 是否登录错误 /login?error
		boolean loginError = isErrorPage(request);
        // 是否登录成功 /login?logout
		boolean logoutSuccess = isLogoutSuccess(request);
		if (isLoginUrlRequest(request) || loginError || logoutSuccess) {
            //1.  /login?error、/login?logout、/login 三种请求URL中的任意一种会进入该方法
			String loginPageHtml = generateLoginPageHtml(request, loginError, logoutSuccess);
            //2. 生成登录页
			response.setContentType("text/html;charset=UTF-8");
			response.setContentLength(loginPageHtml.getBytes(StandardCharsets.UTF_8).length);
            //3. 直接写出,并结束
			response.getWriter().write(loginPageHtml);
			return;
		}
		chain.doFilter(request, response);
	}
最终,默认的登录页面就展示出来了:

4. 表单登录
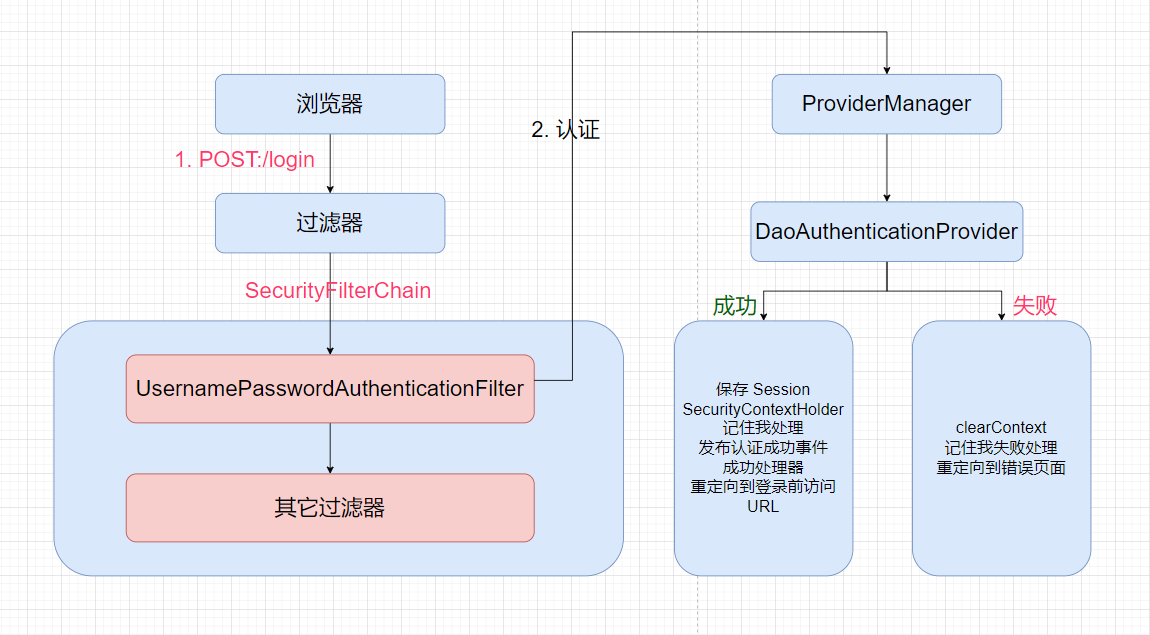
流程说明:
- 输入用户名、密码提交登录,登录请求会被UsernamePasswordAuthenticationFilter处理,构建预认证对象UsernamePasswordAuthenticationToken
- 调用AuthenticationManager(实现类是ProviderManager)进行认证
- ProviderManager查询所有认证提供者,DaoAuthenticationProvider符合当前认证类型
- DaoAuthenticationProvider查询用户,校验密码
- 身份验证成功,存储会话、发布事件、调用成功处理器
- 身份验证失败,清除SecurityContext,调用失败处理器
4.1 首先是进入AbstractAuthenticationProcessingFilter
在进行表单登录时,登录请求会被传递到 UsernamePasswordAuthenticationFilter 过滤器中。该过滤器负责拦截前端提交的 POST 登录表单请求,并进行身份认证。
在该过滤器的 doFilter 方法中,实际上执行的是其父类 AbstractAuthenticationProcessingFilter.doFilter 方法。这是一个抽象类,采用了模板设计模式,主要用于执行认证过滤器。根据不同的认证方式,它会执行不同子类的认证逻辑。通过观察其实现类,我们可以看到 Security 提供了多种认证方式。
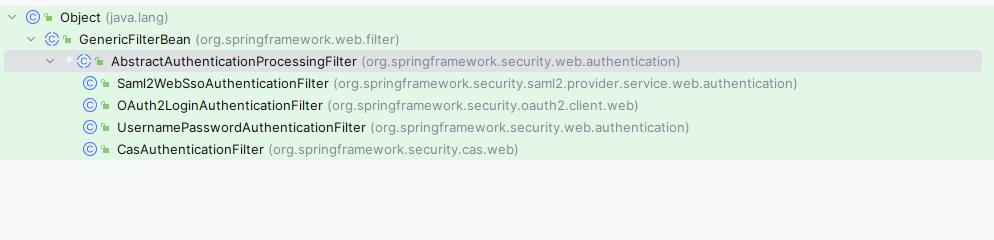
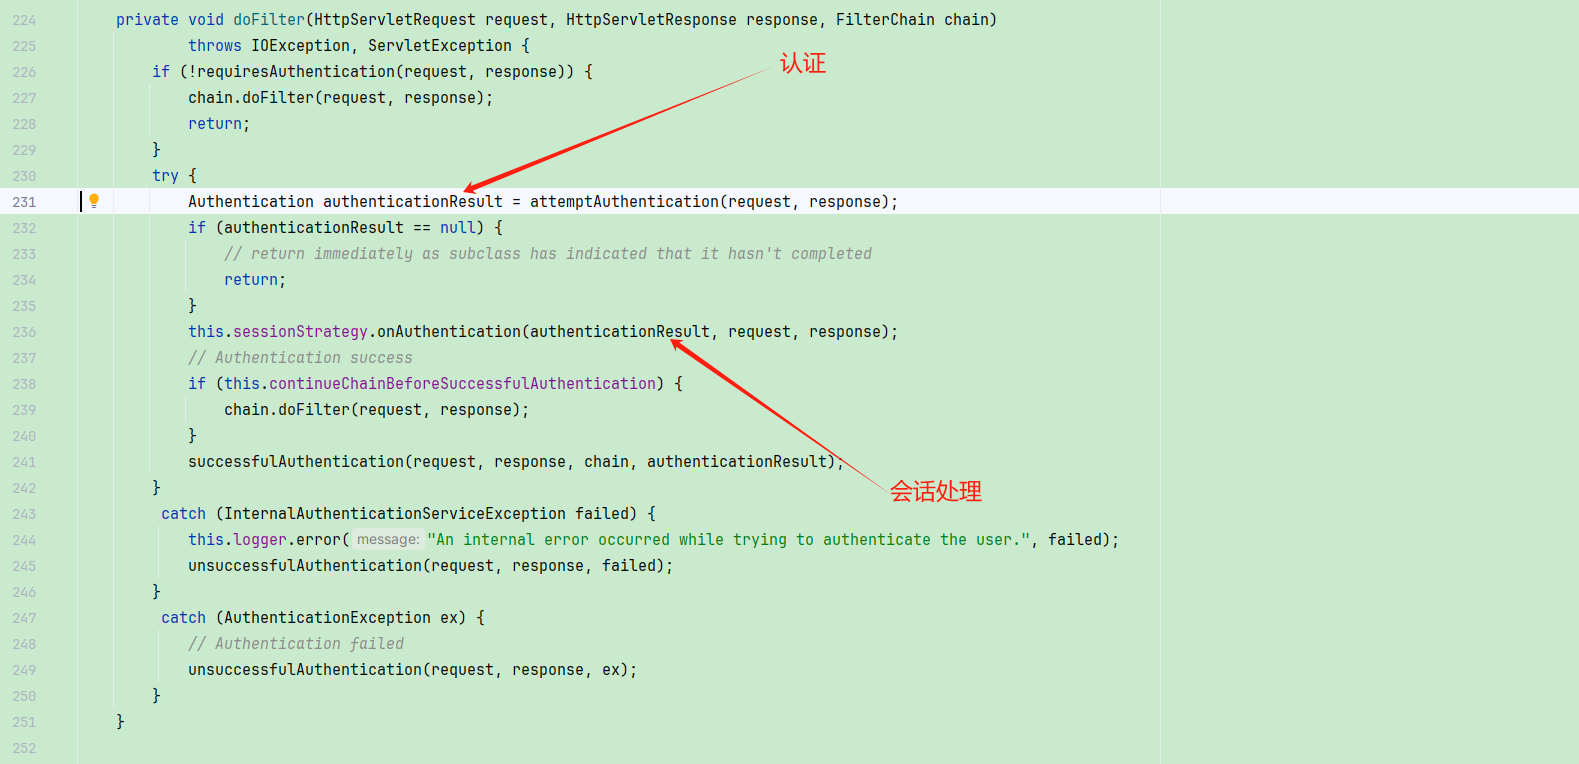
AbstractAuthenticationProcessingFilter的doFilter方法,几乎完成了认证的所有流程。
	// 过滤方法
	private void doFilter(HttpServletRequest request, HttpServletResponse response, FilterChain chain)
			throws IOException, ServletException {
        // 1. 判断是否需要认证
		if (!requiresAuthentication(request, response)) {
			chain.doFilter(request, response);
			return;
		}
		try {
            // 2. 调用子类方法认证,认证信息封装到 Authentication 中
			Authentication authenticationResult = attemptAuthentication(request, response);
			if (authenticationResult == null) {
				// return immediately as subclass has indicated that it hasn't completed
				return;
			}
            // 3. Session 策略处理
			this.sessionStrategy.onAuthentication(authenticationResult, request, response);
			// Authentication success
			if (this.continueChainBeforeSuccessfulAuthentication) {
				chain.doFilter(request, response);
			}
            // 4. 成功处理
			successfulAuthentication(request, response, chain, authenticationResult);
		}
		catch (InternalAuthenticationServiceException failed) {
			this.logger.error("An internal error occurred while trying to authenticate the user.", failed);
            // 5. 失败处理
			unsuccessfulAuthentication(request, response, failed);
		}
		catch (AuthenticationException ex) {
			// Authentication failed
            // 6. 失败处理
			unsuccessfulAuthentication(request, response, ex);
		}
	}
4.2 然后进入UsernamePasswordAuthenticationFilter
UsernamePasswordAuthenticationFilter的attemptAuthentication方法,该方法会创建一个没有认证的UsernamePasswordAuthenticationToken `认证对象。
    // 用户名和密码认证逻辑
    @Override
	public Authentication attemptAuthentication(HttpServletRequest request, HttpServletResponse response)
			throws AuthenticationException {
        // 1. 设置了只支持Post,而当前不是Post请求时,抛出异常 Authentication method not supported
		if (this.postOnly && !request.getMethod().equals("POST")) {
			throw new AuthenticationServiceException("Authentication method not supported: " + request.getMethod());
		}
        // 2. 请求中获取 username password 参数,去除空格,当参数为null时,设置为空
		String username = obtainUsername(request);
		username = (username != null) ? username.trim() : "";
		String password = obtainPassword(request);
		password = (password != null) ? password : "";
        // 3. 创建 UsernamePasswordAuthenticationToken,标记为未认证
		UsernamePasswordAuthenticationToken authRequest = UsernamePasswordAuthenticationToken.unauthenticated(username,
				password);
		// Allow subclasses to set the "details" property
        // 4. UsernamePasswordAuthenticationToken 设置 Details 信息
		setDetails(request, authRequest);
        // 5. 调用认证管理器进行认证,返回认证信息Authentication
		return this.getAuthenticationManager().authenticate(authRequest);
}UsernamePasswordAuthenticationToken刚创建时,包含了输入的用户名密码、访问IP、sessionID等信息,这时状态为未认证。

认证管理器ProviderManager中包含多个认证提供者AuthenticationProvider:
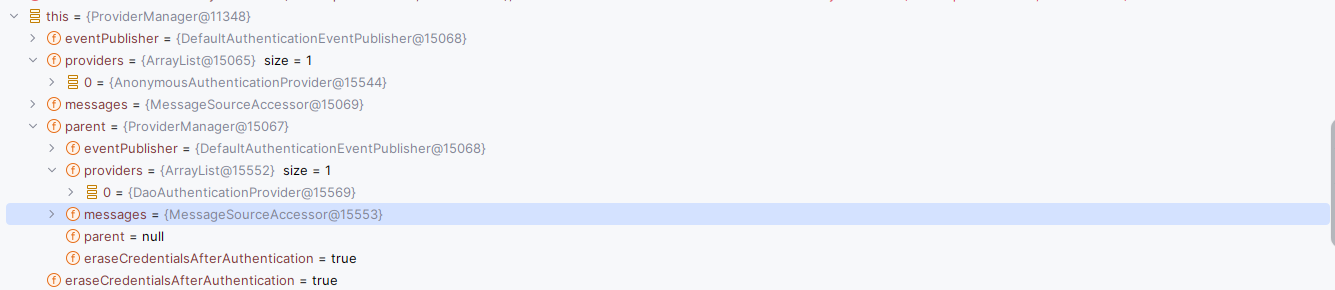
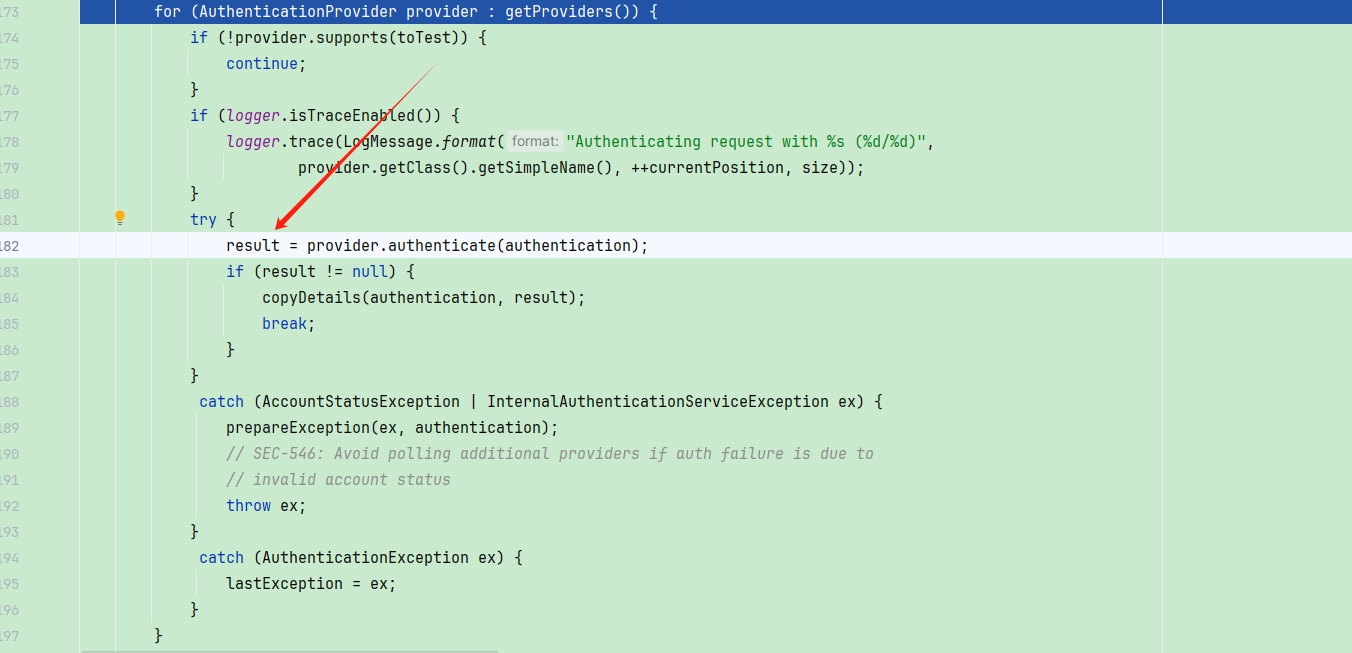
调用认证管理器进行认证时,进入的是 ProviderManager 的 authenticate 方法,先找到支持该类型认证的提供者,然后调用其认证方法:
4.3 最后进入 DaoAuthenticationProvider
UsernamePasswordAuthenticationToken 类型的 Authentication 对象由 DaoAuthenticationProvider 处理。处理的第一步是调用父类 AbstractUserDetailsAuthenticationProvider 中的 authenticate 方法。在这个过程中,涉及到对数据库进行用户信息查询以及检查相关状态。
	// 认证逻辑
	@Override
	public Authentication authenticate(Authentication authentication) throws AuthenticationException {
		// 断言传入的认证对象必须是 UsernamePasswordAuthenticationToken 类型
		Assert.isInstanceOf(UsernamePasswordAuthenticationToken.class, authentication,
				() -> this.messages.getMessage("AbstractUserDetailsAuthenticationProvider.onlySupports",
						"Only UsernamePasswordAuthenticationToken is supported"));
		// 从认证对象中获取用户名
		String username = determineUsername(authentication);
        // 标记是否使用了缓存
		boolean cacheWasUsed = true;
        // 从用户缓存中获取用户详情对象
		UserDetails user = this.userCache.getUserFromCache(username);
        // 如果缓存中没有用户详情对象
		if (user == null) {
            // 设置缓存标记为false
			cacheWasUsed = false;
			try {
                // 调 loadUserByUsername 方法获取数据库中查询的用户
				user = retrieveUser(username, (UsernamePasswordAuthenticationToken) authentication);
			}
			catch (UsernameNotFoundException ex) {
                // 如果用户服务中找不到用户,记录日志
				this.logger.debug("Failed to find user '" + username + "'");
				if (!this.hideUserNotFoundExceptions) {
					throw ex;
				}
				throw new BadCredentialsException(this.messages
					.getMessage("AbstractUserDetailsAuthenticationProvider.badCredentials", "Bad credentials"));
			}
            // 断言用户详情对象不为空
			Assert.notNull(user, "retrieveUser returned null - a violation of the interface contract");
		}
		try {
            // 对用户详情对象进行预认证检查,比如是否过期、是否锁定等
			this.preAuthenticationChecks.check(user);
            // 对用户详情对象进行额外的认证检查,比如密码是否匹配等
			additionalAuthenticationChecks(user, (UsernamePasswordAuthenticationToken) authentication);
		}
		catch (AuthenticationException ex) {
            // 如果发生认证异常
			if (!cacheWasUsed) {
				throw ex;
			}
            // 否则,重新从用户服务中获取用户详情对象,以防缓存中的数据过期
			cacheWasUsed = false;
			user = retrieveUser(username, (UsernamePasswordAuthenticationToken) authentication);
            // 再次进行预认证检查和额外的认证检查
			this.preAuthenticationChecks.check(user);
			additionalAuthenticationChecks(user, (UsernamePasswordAuthenticationToken) authentication);
		}
        // 对用户详情对象进行后认证检查,比如是否启用等
		this.postAuthenticationChecks.check(user);
        // 如果没有使用缓存
		if (!cacheWasUsed) {
            // 将用户详情对象放入缓存中
			this.userCache.putUserInCache(user);
		}
        // 定义要返回的主体对象
		Object principalToReturn = user;
        // 如果强制将主体对象转换为字符串
		if (this.forcePrincipalAsString) {
            // 则将主体对象设置为用户的用户名
			principalToReturn = user.getUsername();
		}
        // 创建成功的认证对象,并返回
		return createSuccessAuthentication(principalToReturn, authentication, user);
}数据库查询出用户后,additionalAuthenticationChecks 会对输入密码进行校验:
    // 密码校验
	@Override
	@SuppressWarnings("deprecation")
	protected void additionalAuthenticationChecks(UserDetails userDetails,
			UsernamePasswordAuthenticationToken authentication) throws AuthenticationException {
        // 如果认证对象没有提供凭证,即密码为空
		if (authentication.getCredentials() == null) {
            // 记录调试信息
			this.logger.debug("Failed to authenticate since no credentials provided");
			throw new BadCredentialsException(this.messages
				.getMessage("AbstractUserDetailsAuthenticationProvider.badCredentials", "Bad credentials"));
		}
        // 将认证对象的凭证转换为字符串
		String presentedPassword = authentication.getCredentials().toString();
        // 如果密码编码器无法匹配用户的密码和认证对象的凭证
		if (!this.passwordEncoder.matches(presentedPassword, userDetails.getPassword())) {
			this.logger.debug("Failed to authenticate since password does not match stored value");
            // 抛出凭证错误的异常
			throw new BadCredentialsException(this.messages
				.getMessage("AbstractUserDetailsAuthenticationProvider.badCredentials", "Bad credentials"));
		}
}密码校验成功后,AbstractUserDetailsAuthenticationProvider就会创建一个认证成功的Authentication对象:
    // 创建已认证的Authentication
	protected Authentication createSuccessAuthentication(Object principal, Authentication authentication,
			UserDetails user) {
		// 保证返回用户提供的原始凭证,以便后续的尝试能够成功,即使密码是经过编码的
		// 同时保证返回原始的getDetails(),以便缓存过期后的认证事件包含细节
		// 创建一个已认证的UsernamePasswordAuthenticationToken对象,包含主体、凭证和权限
		UsernamePasswordAuthenticationToken result = UsernamePasswordAuthenticationToken.authenticated(principal,
				authentication.getCredentials(), this.authoritiesMapper.mapAuthorities(user.getAuthorities()));
		result.setDetails(authentication.getDetails());
		this.logger.debug("Authenticated user");
		return result;
	}
4.4 会话策略处理
回到第一步 AbstractAuthenticationProcessingFilter 中的 doFilter 方法进行认证成功的后续处理:
可以看到sessionStrategy使用了两个策略进行会话处理:

CsrfAuthenticationStrategy :它负责在执行认证请求之后, 删除旧的令牌, 生成新的,确保每次请求之后, csrf-token 都得到更新
ChangeSessionIdAuthenticationStrategy:主要是使用HttpServletRequest.changeSessionId()方法修改sessionID来防止会话固定攻击。
4.5 成功处理
会话处理完成后,调用successfulAuthentication进行认证成功后续处理。
			// 成功处理
			successfulAuthentication(request, response, chain, authenticationResult);
详细代码如下
	protected void successfulAuthentication(HttpServletRequest request, HttpServletResponse response, FilterChain chain,
			Authentication authResult) throws IOException, ServletException {
        // 把认证信息封装到 SecurityContext 中
		SecurityContext context = this.securityContextHolderStrategy.createEmptyContext();
		context.setAuthentication(authResult);
		this.securityContextHolderStrategy.setContext(context);
		this.securityContextRepository.saveContext(context, request, response);
		if (this.logger.isDebugEnabled()) {
			this.logger.debug(LogMessage.format("Set SecurityContextHolder to %s", authResult));
		}
        //  rememberMe 处理
		this.rememberMeServices.loginSuccess(request, response, authResult);
		if (this.eventPublisher != null) {
            // 发布认证成功事件
			this.eventPublisher.publishEvent(new InteractiveAuthenticationSuccessEvent(authResult, this.getClass()));
		}
        // 调用成功处理器,重定向到登录前 URL
		this.successHandler.onAuthenticationSuccess(request, response, authResult);
	}
在认证成功后,用户信息会被保存在 SecurityContextHolder 和会话(Session)中。成功处理器将会重定向到用户之前访问的URL。接下来,请求会继续经过过滤器。由于当前已完成认证,所以直接返回接口请求的资源。这确保了认证成功后的顺利访问。
4.6 失败处理
如果认证失败,比如密码错误,会进入到AbstractAuthenticationProcessingFilter失败处理方法中:

失败处理方法逻辑如下:
	protected void unsuccessfulAuthentication(HttpServletRequest request, HttpServletResponse response,
			AuthenticationException failed) throws IOException, ServletException {
        // 清理 securityContext
		this.securityContextHolderStrategy.clearContext();
		this.logger.trace("Failed to process authentication request", failed);
		this.logger.trace("Cleared SecurityContextHolder");
		this.logger.trace("Handling authentication failure");
        // 记住我处理
		this.rememberMeServices.loginFail(request, response);
        // 调用失败处理器
		this.failureHandler.onAuthenticationFailure(request, response, failed);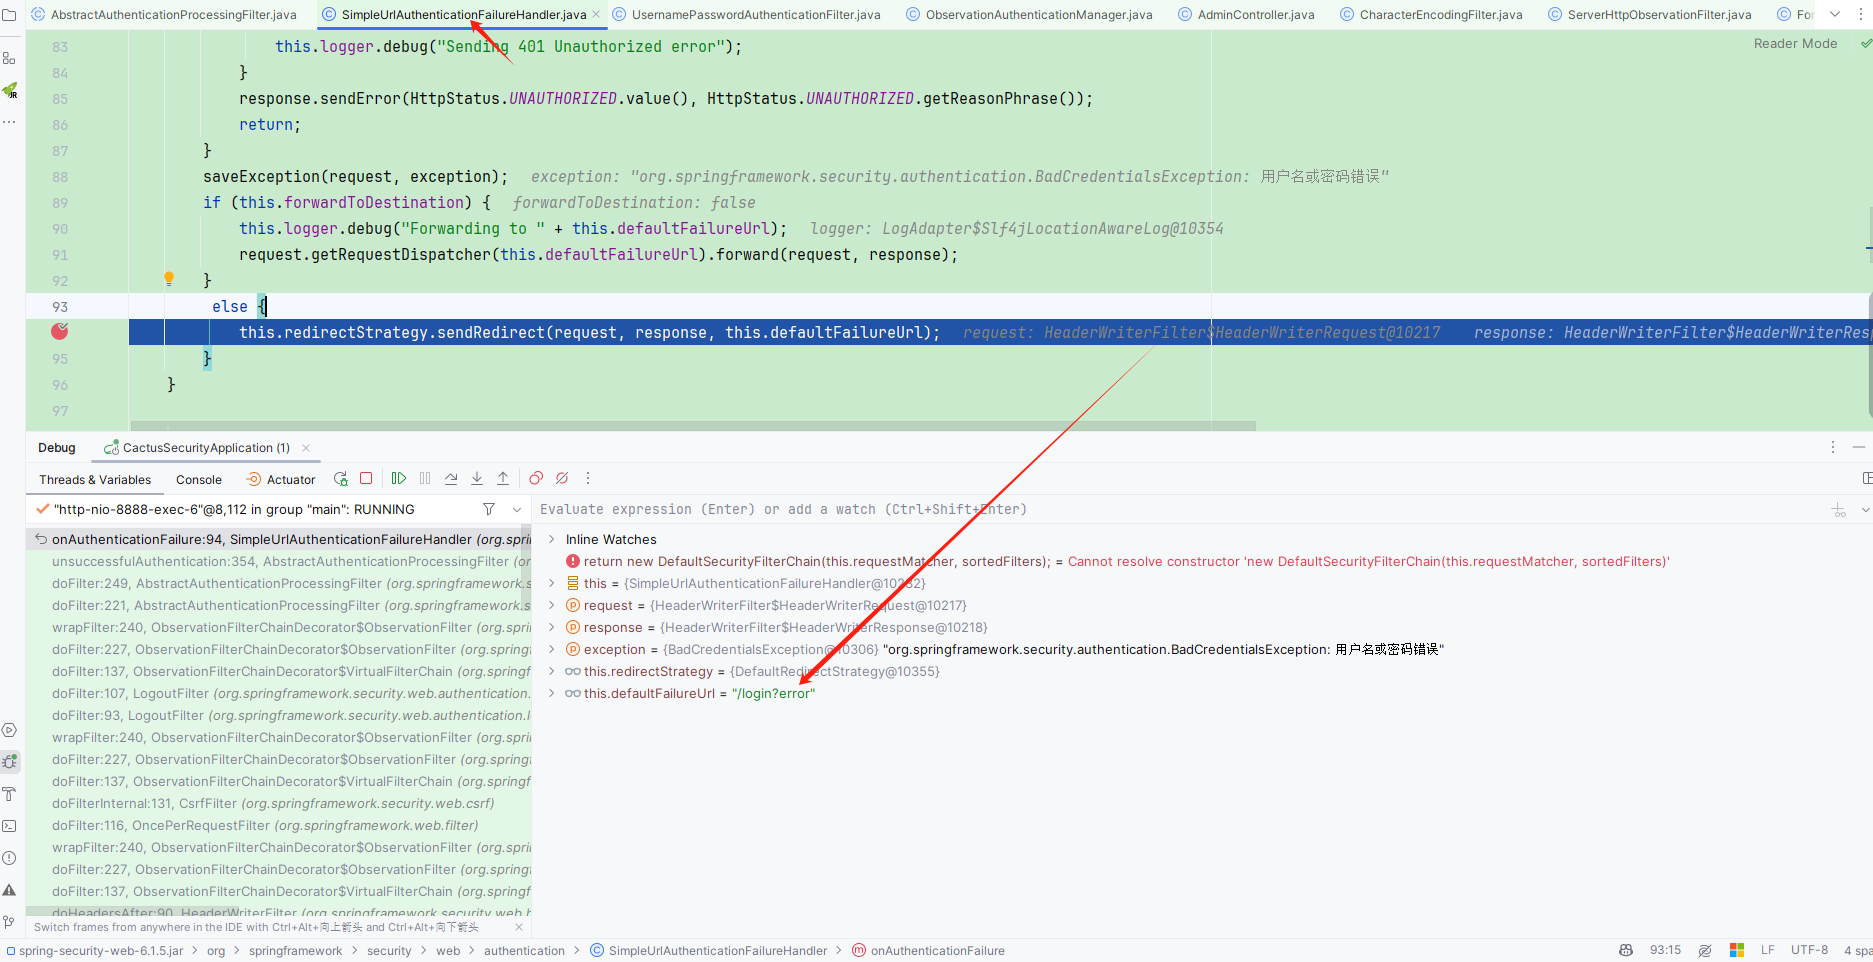
}失败处理器默认使用的是SimpleUrlAuthenticationFailureHandler,将页面重定向到/login?error:
重定向的/login?error再次发起请求会被DefaultLoginPageGeneratingFilter处理,又重定向到登录页,并显示错误信息: