Idea 部署服务的使用
IntelliJ IDEA Deployment 教程
简介
在本教程中,我们将讨论如何使用IntelliJ IDEA的Deployment模块来简化部署过程。Deployment模块允许您将本地开发的应用程序代码部署到远程服务器上。
前提条件
- 安装了IntelliJ IDEA
- 基本的IDEA使用知识
- 访问权限到远程服务器(FTP/SFTP/FTPS等)
配置Deployment模块
1. 打开Deployment设置
在IDEA中,点击
File菜单选择
Settings在设置或首选项窗口中,导航到
Build, Execution, Deployment>Deployment
PixPin_2024-05-07_17-15-04
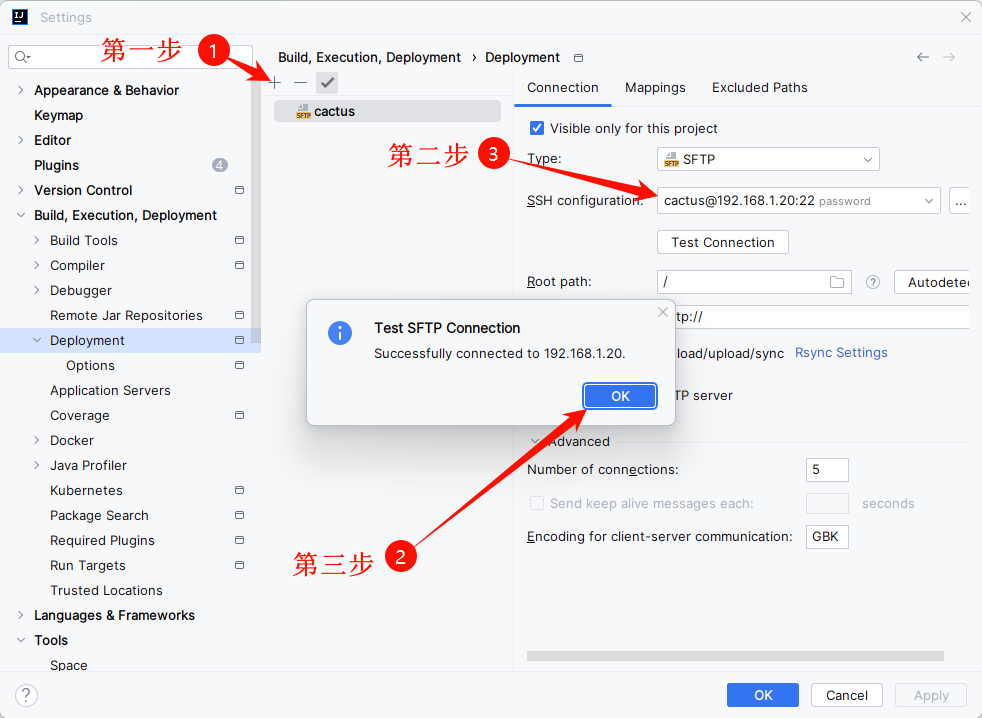
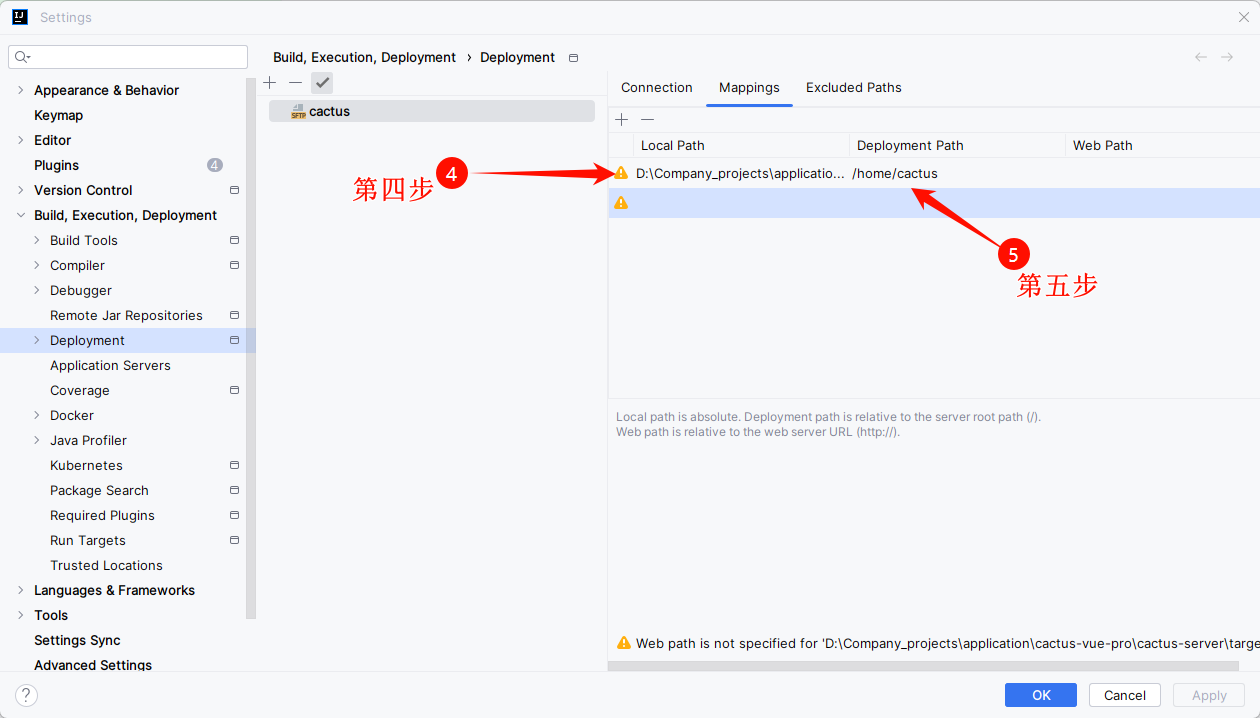
2. 具体配置
在IDEA中,点击 File 菜单,选择 Settings,在设置或首选项窗口中,导航到 Build, Execution, Deployment > Deployment。然后配置服务器详情、映射本地与远程路径、测试连接。
部署项目
1. 手动上转文件到服务器
选中文件,鼠标点击右键找到选项 Deployment > Upload to cactus, 等待上传文件完毕。在配置的服务器指定目录下就能看到上传的文件。
2. 自动上传
在 Tools 菜单中的 Deployment 设置中,您可以启用 Automatic Upload(保存时自动上传)功能,以确保最新的更改总是被部署。
选择 Sync with Deployed to... 来查看哪些文件将被上传或下载。
监听启动项目
编写监听上传的文件,当上传的文件inode号码和修改时间戳改变时,进行项目的重新部署运行。
sudo tee /sg-work/cactus-server/start.sh <<-'EOF'

#!/bin/bash

# 定义一个部署函数
deploy_cactus_server() {
    echo "Start deploying..."
    sh deploy.sh
    echo "Deployment done."
}


# 定义一个通用的检查和处理文件变化的函数
handle_file_change() {
    local file_path="$1"
    local target_path="$2"
    local dockerfile_path="$3"
    local is_directory="$4"

    while true; do

        if [ -d "$file_path" ] || [ -f "$file_path" ]; then
            echo "File/Directory has been replaced or modified at $file_path."
            sleep 15  # 等待上传完成

            if [ "$is_directory" = "yes" ]; then
                # 对于目录,使用 rsync 进行同步
                rsync -av --delete "$file_path/" "$target_path/"
                echo "Directory synchronized: $target_path"
                rm -r "$file_path" && echo "Old directory removed: $file_path" || { echo "Failed to remove old directory: $target_path"; continue; }
            else
                # 对于文件,使用原子操作进行替换
                rm "$target_path"
                mv "$file_path" "$target_path.tmp" && \
                mv -f "$target_path.tmp" "$target_path" && \
                echo "New file moved to $target_path"
            fi

            if [ -n "$dockerfile_path" ]; then
                docker build -t cactus-server -f "$dockerfile_path" . && echo "Docker build successful." || { echo "Docker build failed."; continue; }
                deploy_cactus_server
            fi

          else
                 echo "File or directory does not exist. $file_path."

        fi

        sleep 15
    done
}

# 启动后端服务模块的监听
handle_file_change "/home/cactus/cactus-server.jar" "/sg-work/cactus-server/cactus-server.jar" "/sg-work/cactus-server/Dockerfile" "no" &
# 启动后端页面模块的监听
handle_file_change "/home/cactus/dist-dev" "/sg-work/nginx/html/cactus-ui-admin-vue3" "" "yes" &
# 启动门户页面模块的监听
handle_file_change "/home/cactus/dist" "/sg-work/nginx/html/cactus-ui-web-vue2" "" "yes" &


wait

EOF
查看进程使用内存:
- cat /proc/[ PID ]/status | grep 'VmSize|VmRSS' | awk '{print $1, $2/1024/1024, "GB"}'
后台启动此监听脚本
nohup /sg-work/cactus-server/start.sh > /sg-work/cactus-server/start.log 2>&1 &
动态查看输出的日志
tail -f /sg-work/cactus-server/start.log
编写停止以上脚本的命令
#!/bin/bash

# 使用 pgrep 寻找特定脚本的 PID
PID=$(ps aux  | grep /sg-work/cactus-server/[s]tart.sh | awk '{print $2}')

# 检查是否找到了 PID
if [ -z "$PID" ]; then
    echo "No process found."
    exit 1
else
    echo "Killing process with PID $PID..."
    kill -9 $PID
    echo "Process $PID has been killed."
fi

exit 0
关于 Docker 的一些命令:
- 删除个镜像:docker rmi $(docker images | grep cactus-server | awk '{print $3}')
Docker 的层级缓存机制非常有效地帮助节省时间和资源,在文件或指令未变更的情况下,重新构建将不会改变镜像 ID。要管理和控制这种行为,你可以选择使用
--no-cache选项来强制 Docker 进行全新的构建,或者在 Dockerfile 中做微小调整来触发新层的创建。
结论
使用IntelliJ IDEA的Deployment模块可以大大简化远程服务器部署过程。一旦正确配置,您可以轻松同步代码,自动或手动部署更新。


