Docker 部署 cactus-vue-pro
Docker 部署
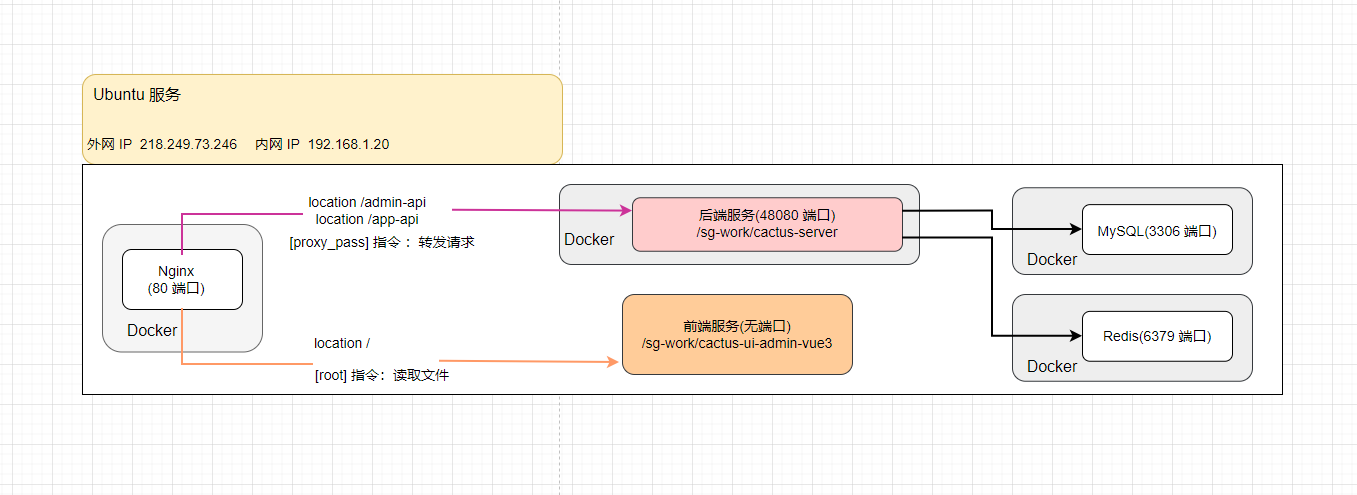
本小节,讲解如何将前端 + 后端项目,使用 Docker 容器,部署到 dev 开发环境下的一台 Linux 服务器上。如下图所示:

注意:服务器的 IP 地址。
- 外网 IP:218.249.73.246
- 内网 IP:192.168.0.213
下属所有涉及到 IP 的配置,需要替换成你自己的。
1. 安装 Docker
执行如下命令,进行 Docker 的安装。
## ① 使用 DaoCloud 的 Docker 高速安装脚本。参考 https://get.daocloud.io/#install-docker
curl -sSL https://get.daocloud.io/docker | sh

## ② 设置 DaoCloud 的 Docker 镜像中心,加速镜像的下载速度。参考 https://www.daocloud.io/mirror
curl -sSL https://get.daocloud.io/daotools/set_mirror.sh | sh -s http://f1361db2.m.daocloud.io

## ③ 启动 Docker 服务
systemctl start docker
离线安装 Docker
Go to
https://download.docker.com/linux/ubuntu/dists/. 转到https://download.docker.com/linux/ubuntu/dists/。Select your Ubuntu version in the list.
在列表中选择您的 Ubuntu 版本。Go to
pool/stable/and select the applicable architecture (amd64,armhf,arm64, ors390x).
转到pool/stable/并选择适用的体系结构(amd64、armhfarm64、 或s390x)。Download the following
debfiles for the Docker Engine, CLI, containerd, and Docker Compose packages:
下载适用于 Docker Engine、CLI、containerd 和 Docker Compose 包的以下deb文件:
containerd.io_<version>_<arch>.debdocker-ce_<version>_<arch>.debdocker-ce-cli_<version>_<arch>.debdocker-buildx-plugin_<version>_<arch>.debdocker-compose-plugin_<version>_<arch>.debInstall the
.debpackages. Update the paths in the following example to where you downloaded the Docker packages.
安装.deb软件包。将以下示例中的路径更新为下载 Docker 包的位置。$ sudo dpkg -i ./containerd.io_<version>_<arch>.deb \ ./docker-ce_<version>_<arch>.deb \ ./docker-ce-cli_<version>_<arch>.deb \ ./docker-buildx-plugin_<version>_<arch>.deb \ ./docker-compose-plugin_<version>_<arch>.debThe Docker daemon starts automatically.
Docker 守护程序会自动启动。
启动 Docker 服务:
sudo systemctl start docker
设置 Docker 服务开机自启:
sudo systemctl enable docker
验证 Docker 是否安装成功:
sudo docker --version
sudo docker run hello-world
1.1 Idea 远程连接 Docker
编辑 docker.service 文件
vim /lib/systemd/system/docker.service
ExecStart 中添加:-H tcp://0.0.0.0:2375 -H unix:///var/run/docker.sock
[Unit]
Description=Docker Application Container Engine
Documentation=https://docs.docker.com
After=network-online.target docker.socket firewalld.service containerd.service time-set.target
Wants=network-online.target containerd.service
Requires=docker.socket

[Service]
Type=notify
# the default is not to use systemd for cgroups because the delegate issues still
# exists and systemd currently does not support the cgroup feature set required
# for containers run by docker
ExecStart=/usr/bin/dockerd -H fd:// -H tcp://1.0.0.0:2375 -H unix:///var/run/docker.sock --containerd=/run/containerd/containerd.sock
ExecReload=/bin/kill -s HUP $MAINPID
TimeoutStartSec=0
RestartSec=2
Restart=always

# Note that StartLimit* options were moved from "Service" to "Unit" in systemd 229.
# Both the old, and new location are accepted by systemd 229 and up, so using the old location
# to make them work for either version of systemd.
StartLimitBurst=3

# Note that StartLimitInterval was renamed to StartLimitIntervalSec in systemd 230.
# Both the old, and new name are accepted by systemd 230 and up, so using the old name to make
# this option work for either version of systemd.
StartLimitInterval=60s

# Having non-zero Limit*s causes performance problems due to accounting overhead
# in the kernel. We recommend using cgroups to do container-local accounting.
LimitNPROC=infinity
LimitCORE=infinity

# Comment TasksMax if your systemd version does not support it.
# Only systemd 226 and above support this option.
TasksMax=infinity

# set delegate yes so that systemd does not reset the cgroups of docker containers
Delegate=yes

# kill only the docker process, not all processes in the cgroup
KillMode=process
OOMScoreAdjust=-500

[Install]
WantedBy=multi-user.target
加载 systemd 管理器的配置并重启 Docker
#加载 systemd 管理器的配置
systemctl daemon-reload
# 重启
systemctl restart docker
# 测试
curl http://127.0.0.1:2375/info
1.2 Docker 镜像导入另一台机器上
1.2.1 使用以下命令查看本地机器上的 Docker 镜像列表
docker images
使用 docker save 命令将 Docker 镜像保存为 tar 文件:
docker save -o <path/to/save/file.tar> <image-name>:<tag>
例如,如果您想导出名为
myapp,标签为latest的镜像,这将会在当前目录下生成一个名为myapp_latest.tar的文件。docker save -o myapp_latest.tar myapp:latest
将导出的 tar 文件(例如 myapp_latest.tar)使用 USB 闪存驱动器、外部硬盘或其他可用的物理介质复制到目标机器上。
1.2.2 将 tar 文件复制到目标机器的任意目录中。
使用 docker load 命令从 tar 文件加载 Docker 镜像:
docker load -i <path/to/file.tar>
例如,如果文件名是
myapp_latest.tar,以下命令将解压并将 Docker 镜像导入到目标机器的 Docker 环境中。docker load -i myapp_latest.tar
2. 配置 MySQL
2.1 安装 MySQL(可选)
友情提示:使用 Docker 安装 MySQL 是可选步骤,也可以直接安装 MySQL,或者购买 MySQL 云服务。
① 执行如下命令,使用 Docker 启动 MySQL 容器。
docker run -v /work/mysql/:/var/lib/mysql \
-p 3306:3306 -e MYSQL_ROOT_PASSWORD=123456 \
--restart=always --name mysql -d mysql
- 数据库文件,挂载到服务器的的
/work/mysql/目录下 - 端口是 3306,密码是 123456
② 执行 ls /work/mysql 命令,查看 /work/mysql/ 目录的数据库文件。

2.2 导入 SQL 脚本
创建一个名字为 cactus-vue-pro 数据库,执行数据库对应的 sql .

2.2.3 控制台命令方式创建数据库
创建一个名字为 cactus-vue-pro 数据库,并指定了字符集和排序规则。
mysql -u root -p

CREATE DATABASE `cactus-vue-pro-20` CHARACTER SET utf8mb4 COLLATE utf8mb4_unicode_ci;

exit;
把需要导入的文件上传到服务器指定位置后,进行导入操作。
# 从命令行导入 SQL 文件到数据库
mysql -u root -p mydatabase < /path/to/mydatabase.sql
3. 配置 Redis
友情提示:使用 Docker 安装 Redis 是可选步骤,也可以直接安装 Redis,或者购买 Redis 云服务。
执行如下命令,使用 Docker 启动 Redis 容器。
docker run -d --name redis --restart=always -p 6379:6379 redis:5.0.14-alpine
- 端口是 6379,密码未设置
4. 部署后端
4.1 修改配置
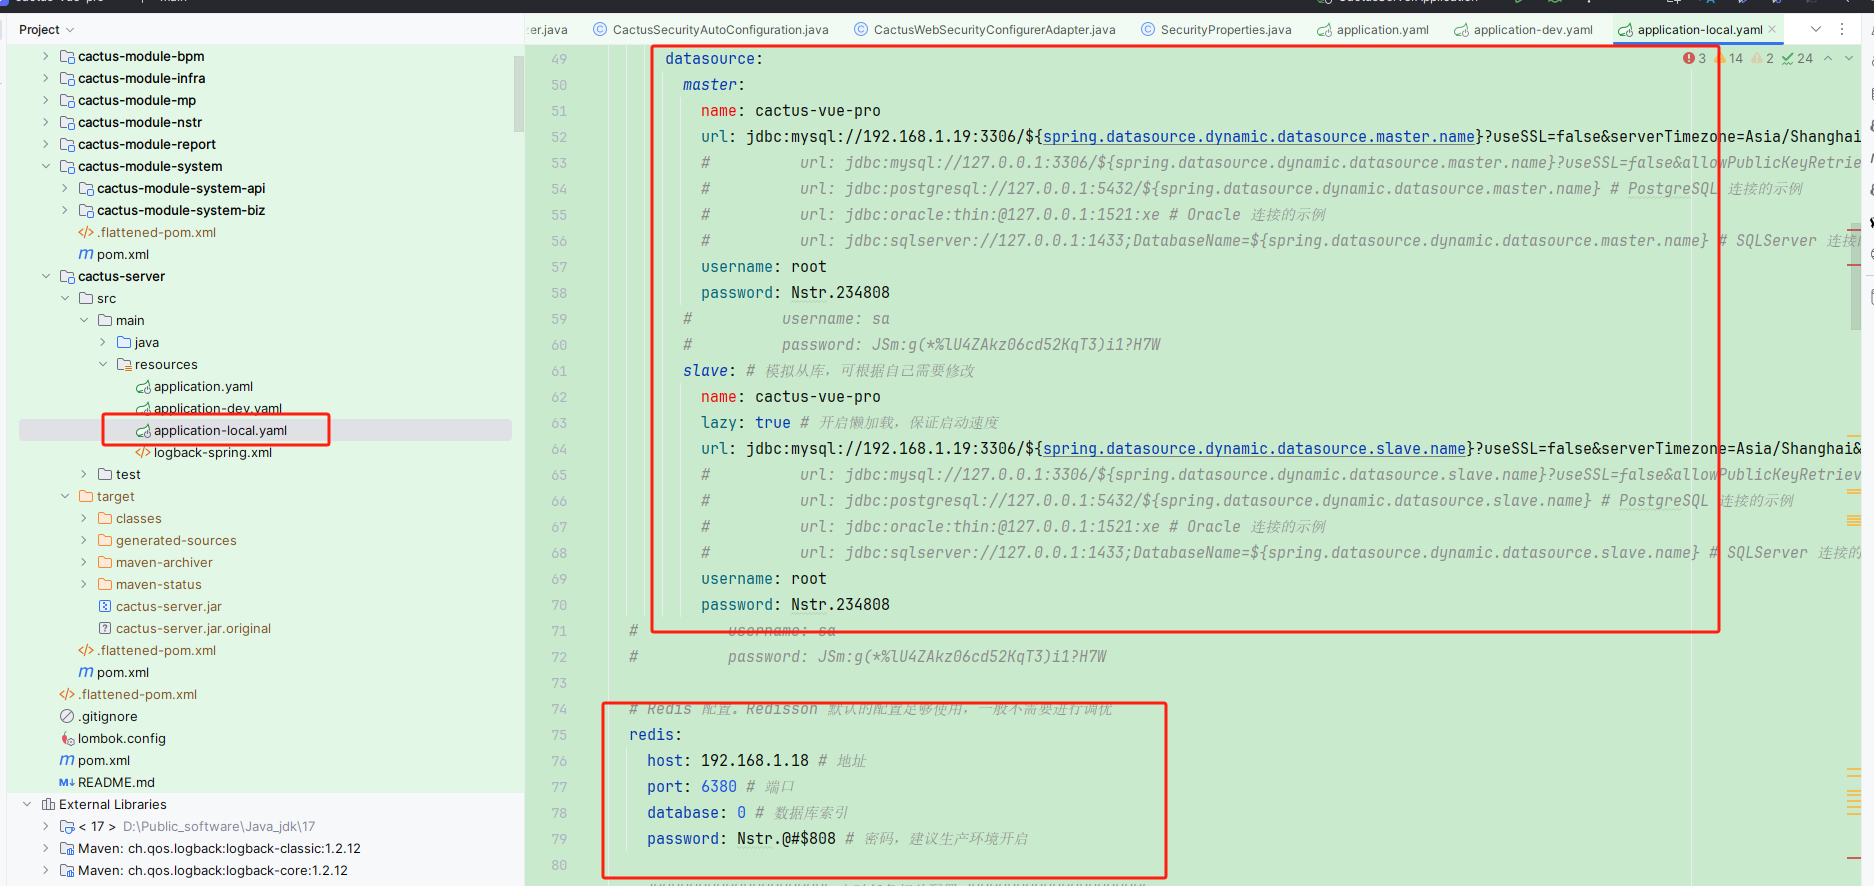
后端 dev 开发环境对应的是 application-dev.yaml 配置文件,主要是修改 MySQL 和 Redis 为你的地址。如下图所示:

4.2 编译后端
在项目的根目录下,执行 mvn clean package -Dmaven.test.skip=true 命令,编译后端项目,构建出它的 Jar 包。如下图所示:

疑问:-Dmaven.test.skip=true 是什么意思?
跳过单元测试的执行。如果你项目的单元测试写的不错,建议使用 mvn clean package 命令,执行单元测试,保证交付的质量。
4.3 上传 Jar 包
在 Linux 服务器上创建 /sg-work/cactus-server 目录,使用 scp 命令或者 FTP 工具,将 yudao-server.jar 上传到该目录下。如下图所示:

4.4 构建镜像
① 在 /work/projects/yudao-server 目录下,新建 Dockerfile文件,用于制作后端项目的 Docker 镜像。编写内容如下:
## AdoptOpenJDK 停止发布 OpenJDK 二进制,而 Eclipse Temurin 是它的延伸,提供更好的稳定性
FROM eclipse-temurin:17

## 创建目录,并使用它作为工作目录
RUN mkdir -p /cactus-server
WORKDIR /cactus-server
## 将后端项目的 Jar 文件,复制到镜像中
COPY cactus-server.jar app.jar

## 设置 TZ 时区
## 设置 JAVA_OPTS 环境变量,可通过 docker run -e "JAVA_OPTS=" 进行覆盖
ENV TZ=Asia/Shanghai JAVA_OPTS="-Xms512m -Xmx512m"

## 暴露后端项目的 48080 端口
EXPOSE 48080

## 启动后端项目
ENTRYPOINT java ${JAVA_OPTS} -Djava.security.egd=file:/dev/./urandom -jar app.jar
② 执行如下命令,构建名字为 yudao-server 的 Docker 镜像。
cd /sg-work/cactus-server
docker build -t cactus-server .

③ 在 /sg-work/cactus-server 目录下,新建 Shell 脚本 deploy.sh,使用 Docker 启动后端项目。编写内容如下:
#!/bin/bash
set -e

## 第一步:删除可能启动的老 cactus-server 容器
echo "开始删除 cactus-server 容器"
docker stop cactus-server || true
docker rm cactus-server || true
echo "完成删除 cactus-server 容器"

## 第二步:启动新的 cactus-server 容器
echo "开始启动 cactus-server 容器"
docker run -d \
--name cactus-server \
-p 48080:48080 \
#-e "SPRING_PROFILES_ACTIVE=dev" \
-v /sg-work/cactus-server:/root/logs/ \
cactus-server
echo "正在启动 cactus-server 容器中,需要等待 60 秒左右"

## 第三步:检测 cactus-server 是否成功运行
echo "正在检测 cactus-server 是否成功运行..."
for i in {1..60}; do
    if docker logs cactus-server 2>&1 | grep -q 'Started CactusServerApplication'; then
        echo "cactus-server 成功启动!"
        exit 0
    else
        echo "等待 cactus-server 启动,已等待 $i 秒..."
        sleep 1
    fi
done

echo "cactus-server 启动失败,请检查日志。"
exit 1
- 应用日志文件,挂载到服务器的的
/sg-work/cactus-server目录下 - 通过
SPRING_PROFILES_ACTIVE设置为dev开发环境
4.5 启动后端
① 执行 sh deploy.sh 命令,使用 Docker 启动后端项目。日志如下:
开始删除 cactus-server 容器
Error response from daemon: No such container: cactus-server
Error response from daemon: No such container: cactus-server
完成删除 cactus-server 容器
开始启动 cactus-server 容器
fd107c6bef193fff323c76a86f9354bca0d0c5e3d8ee345a34f6cb783bd4479b
正在启动 cactus-server 容器中,需要等待 60 秒左右
正在检测 cactus-server 是否成功运行...
等待 cactus-server 启动,已等待 1 秒...
等待 cactus-server 启动,已等待 2 秒...
等待 cactus-server 启动,已等待 3 秒...
等待 cactus-server 启动,已等待 4 秒...
等待 cactus-server 启动,已等待 5 秒...
等待 cactus-server 启动,已等待 6 秒...
等待 cactus-server 启动,已等待 7 秒...
等待 cactus-server 启动,已等待 8 秒...
等待 cactus-server 启动,已等待 9 秒...
等待 cactus-server 启动,已等待 10 秒...
等待 cactus-server 启动,已等待 11 秒...
等待 cactus-server 启动,已等待 12 秒...
等待 cactus-server 启动,已等待 13 秒...
等待 cactus-server 启动,已等待 14 秒...
等待 cactus-server 启动,已等待 15 秒...
等待 cactus-server 启动,已等待 16 秒...
等待 cactus-server 启动,已等待 17 秒...
等待 cactus-server 启动,已等待 18 秒...
等待 cactus-server 启动,已等待 19 秒...
等待 cactus-server 启动,已等待 20 秒...
等待 cactus-server 启动,已等待 21 秒...
等待 cactus-server 启动,已等待 22 秒...
等待 cactus-server 启动,已等待 23 秒...
等待 cactus-server 启动,已等待 24 秒...
等待 cactus-server 启动,已等待 25 秒...
等待 cactus-server 启动,已等待 26 秒...
等待 cactus-server 启动,已等待 27 秒...
等待 cactus-server 启动,已等待 28 秒...
等待 cactus-server 启动,已等待 29 秒...
等待 cactus-server 启动,已等待 30 秒...
等待 cactus-server 启动,已等待 31 秒...
等待 cactus-server 启动,已等待 32 秒...
等待 cactus-server 启动,已等待 33 秒...
等待 cactus-server 启动,已等待 34 秒...
等待 cactus-server 启动,已等待 35 秒...
等待 cactus-server 启动,已等待 36 秒...
等待 cactus-server 启动,已等待 37 秒...
等待 cactus-server 启动,已等待 38 秒...
等待 cactus-server 启动,已等待 39 秒...
cactus-server 成功启动!
② 执行 docker logs cactus-server 命令,查看启动日志。看到如下内容,说明启动完成:
友情提示:如果日志比较多,可以使用 grep 进行过滤。
例如说:使用 docker logs cactus-server | grep 48080
2022-04-15 00:34:19.647 INFO 8 --- [main] [TID: N/A] o.s.b.w.embedded.tomcat.TomcatWebServer : Tomcat initialized with port(s): 48080 (http)
5. 部署前端
5.1 修改配置
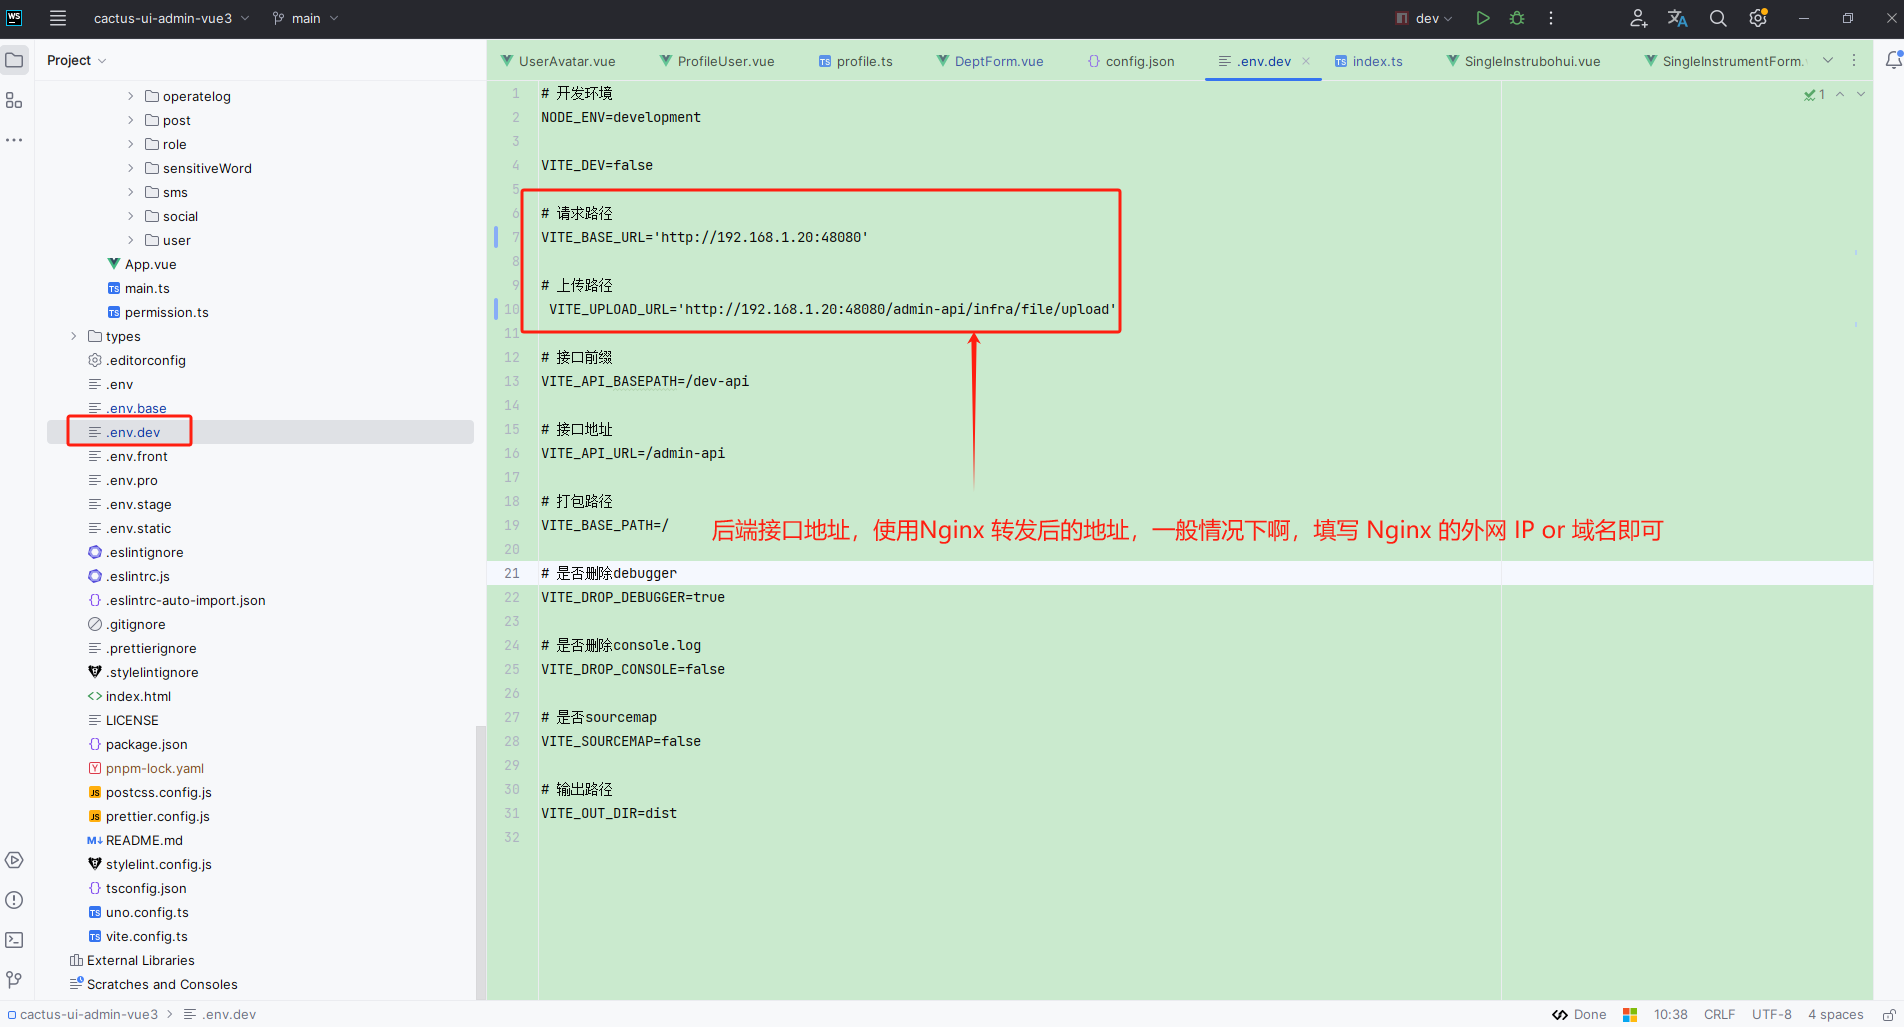
前端 dev 开发环境对应的是 .env.dev配置文件,主要是修改 VUE_APP_BASE_API 为你的后端项目的访问地址。如下图所示:

#5.2 编译前端
友情提示:
下文的 cactus-ui-admin-vue3 目录,指的是你克隆前端项目后的地址!
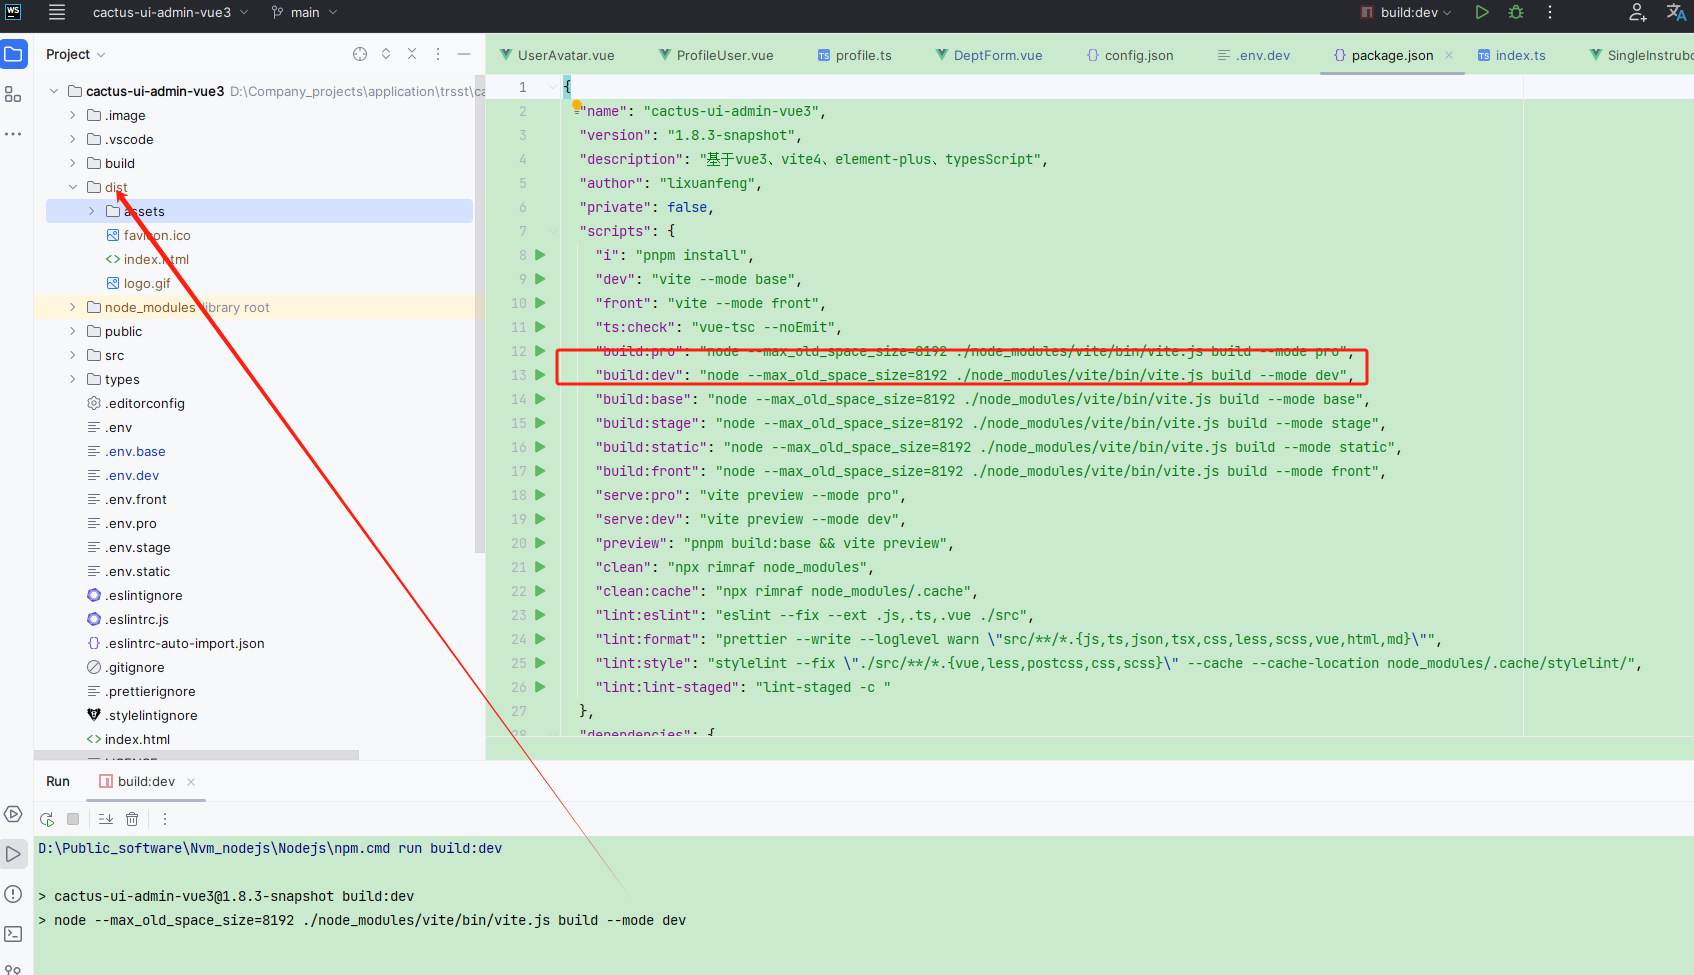
在 cactus-ui-admin-vue3 目录下,执行 npm run build:dev 命令,编译前端项目,构建出它的 dist 文件,里面是 HTML、CSS、JavaScript 等静态文件。如下图所示:

如下想要打包其它环境,可使用如下命令:
npm run build:prod ## 打包 prod 生产环境
npm run build:stage ## 打包 stage 预发布环境
其它高级参数说明【可暂时不看】:
① VUE_APP_APP_NAME:二级部署路径,默认为 / 根目录,一般不用修改。
② mode:前端路由的模式,默认采用 history 路由,一般不用修改。可以通过修改 router/index.js来设置为 hash 路由,示例如下:

5.3 上传 dist 文件
在 Linux 服务器上创建 /sg-work/nginx/html/cactus-ui-admin-vue3 目录,使用 scp 命令或者 FTP 工具,将 dist 上传到 /sg-work/nginx/html 目录下。如下图所示:

5.4 启动前端?
前端无法直接启动,而是通过 Nginx 转发读取 /sg-work/nginx/html/cactus-ui-admin-vue3 目录的静态文件。
6. 配置 Nginx
6.1 安装 Nginx
Nginx 挂载到服务器的目录:
/work/nginx/conf.d用于存放配置文件/work/nginx/html用于存放网页文件/work/nginx/logs用于存放日志/work/nginx/cert用于存放 HTTPS 证书
① 创建 /work/nginx 目录,并在该目录下新建 nginx.conf 文件,避免稍后安装 Nginx 报错。内容如下:
user  nginx;
worker_processes  1;

events {
    worker_connections  1024;
}

error_log  /var/log/nginx/error.log warn;
pid        /var/run/nginx.pid;

http {
    include       /etc/nginx/mime.types;
    default_type  application/octet-stream;
    sendfile        on;
    keepalive_timeout  65;

    log_format  main  '$remote_addr - $remote_user [$time_local] "$request" '
                      '$status $body_bytes_sent "$http_referer" '
                      '"$http_user_agent" "$http_x_forwarded_for"';
#    access_log  /var/log/nginx/access.log  main;

    gzip on;
    gzip_min_length 1k;     # 设置允许压缩的页面最小字节数
    gzip_buffers 4 16k;     # 用来存储 gzip 的压缩结果
    gzip_http_version 1.1;  # 识别 HTTP 协议版本
    gzip_comp_level 2;      # 设置 gzip 的压缩比 1-9。1 压缩比最小但最快,而 9 相反
    gzip_types text/plain application/x-javascript text/css application/xml application/javascript; # 指定压缩类型
    gzip_proxied any;       # 无论后端服务器的 headers 头返回什么信息,都无条件启用压缩

    include /etc/nginx/conf.d/*.conf; ## 加载该目录下的其它 Nginx 配置文件
}
② 执行如下命令,使用 Docker 启动 Nginx 容器。
docker run -d \
--name nginx --restart always \
-p 80:80 -p 443:443 \
-e "TZ=Asia/Shanghai" \
-v /sg-work/nginx/nginx.conf:/etc/nginx/nginx.conf \
-v /sg-work/nginx/conf.d:/etc/nginx/conf.d \
-v /sg-work/nginx/logs:/var/log/nginx \
-v /sg-work/nginx/cert:/etc/nginx/cert \
-v /sg-work/nginx/html:/usr/share/nginx/html \
nginx:alpine
③ 执行 docker ps 命令,查看到 Nginx 容器的状态是 UP 的。
下面,来看两种 Nginx 的配置,分别满足服务器 IP、独立域名的不同场景。
6.2 方式一:服务器 IP 访问
① 在 /sg-work/nginx/conf.d 目录下,创建 cactus-vue-pro.conf,内容如下:
server {
    listen       80;
    server_name  218.249.73.249; ## 重要!!!修改成你的外网 IP/域名

    location / { ## 前端项目
        root   /usr/share/nginx/html/cactus-ui-admin-vue3;
        index  index.html index.htm;
        try_files $uri $uri/ /index.html;
    }

    location /admin-api/ { ## 后端项目 - 管理后台
        proxy_pass http://192.168.1.20:48080/admin-api/; ## 重要!!!proxy_pass 需要设置为后端项目所在服务器的 IP
        proxy_set_header Host $http_host;
        proxy_set_header X-Real-IP $remote_addr;
        proxy_set_header REMOTE-HOST $remote_addr;
        proxy_set_header X-Forwarded-For $proxy_add_x_forwarded_for;
    }

    location /app-api/ { ## 后端项目 - 用户 App
        proxy_pass http://192.168.1.20:48080/app-api/; ## 重要!!!proxy_pass 需要设置为后端项目所在服务器的 IP
        proxy_set_header Host $http_host;
        proxy_set_header X-Real-IP $remote_addr;
        proxy_set_header REMOTE-HOST $remote_addr;
        proxy_set_header X-Forwarded-For $proxy_add_x_forwarded_for;
    }

}


